Metal siding installation offers a durable and aesthetically pleasing exterior solution for your home. This guide delves into the intricacies of this process, from selecting the right materials and understanding the installation steps to addressing common challenges and ensuring long-term maintenance. We’ll explore various metal siding types – aluminum, steel, zinc, and copper – comparing their durability, cost, and aesthetic appeal. We’ll also cover essential tools, safety precautions, cost considerations, and environmentally conscious practices, providing you with a complete understanding of metal siding installation from start to finish.
Understanding the nuances of metal siding installation is crucial for achieving a successful and long-lasting result. This involves careful planning, precise measurements, and the correct application of techniques. From preparing the surface and installing flashing to securing the panels and addressing potential challenges, each step plays a vital role in the overall outcome. This comprehensive guide will equip you with the knowledge and confidence to tackle this project, whether you’re a seasoned DIY enthusiast or a homeowner looking for a detailed understanding before hiring a contractor.
Types of Metal Siding
Metal siding offers a durable and aesthetically pleasing alternative to traditional materials like wood or vinyl. Its longevity, low maintenance, and resistance to various weather conditions make it a popular choice for homeowners. However, the specific properties and characteristics vary significantly depending on the type of metal used. This section will explore the key differences between common metal siding materials.
Aluminum Siding
Aluminum siding is lightweight, relatively inexpensive, and easy to install. Its lightweight nature makes it a good choice for older homes with less robust framing. Common finishes include painted colors, mimicking wood grain, or a smooth, metallic look. Aluminum’s inherent resistance to rust is a significant advantage, but it can dent more easily than steel. Regular cleaning with soap and water is generally sufficient for maintenance. Scratches and minor dents can be touched up with paint.
Steel Siding
Steel siding boasts superior strength and durability compared to aluminum. It’s less prone to dents and damage from impact. Steel siding is also available in a wider variety of colors and finishes, including textured options that replicate the appearance of stone or wood. However, steel siding is generally more expensive than aluminum and requires careful handling during installation to prevent scratches. Proper maintenance involves occasional cleaning and addressing any signs of surface rust promptly with a rust-removing agent followed by a protective paint. The zinc coating on many steel sidings provides excellent rust protection.
Zinc Siding
Zinc siding is a premium option known for its exceptional longevity and self-healing properties. The naturally occurring patina that develops over time adds a unique aesthetic appeal. Zinc is highly resistant to corrosion and requires minimal maintenance. It’s a more expensive option upfront, but its extremely long lifespan can offset this cost over time. Regular cleaning with a soft brush and water is generally sufficient; however, any significant damage should be addressed by a professional. The distinctive look of zinc siding is often preferred by those seeking a modern or industrial aesthetic.
Copper Siding
Copper siding is a luxurious and exceptionally durable choice, known for its rich color and inherent resistance to corrosion. Over time, it develops a beautiful verdigris patina, a characteristic green hue. Copper is extremely resistant to rust and requires minimal maintenance, making it a very low-maintenance option. However, it is significantly more expensive than aluminum or steel siding. Occasional cleaning with a soft brush and water will help maintain its appearance. Its high cost and relatively soft nature (compared to steel) make it less commonly used than other metal siding types.
Comparison of Metal Siding Types
The following table summarizes the key differences between aluminum, steel, and zinc siding:
| Siding Type | Lifespan (Years) | Cost per Square Foot ($) | Common Finishes |
|---|---|---|---|
| Aluminum | 30-50 | 2-5 | Painted, wood grain, smooth |
| Steel | 40-70 | 4-8 | Painted, textured, stone, wood grain |
| Zinc | 80+ | 8-15 | Natural patina, pre-weathered finishes |
Metal Siding Installation Process
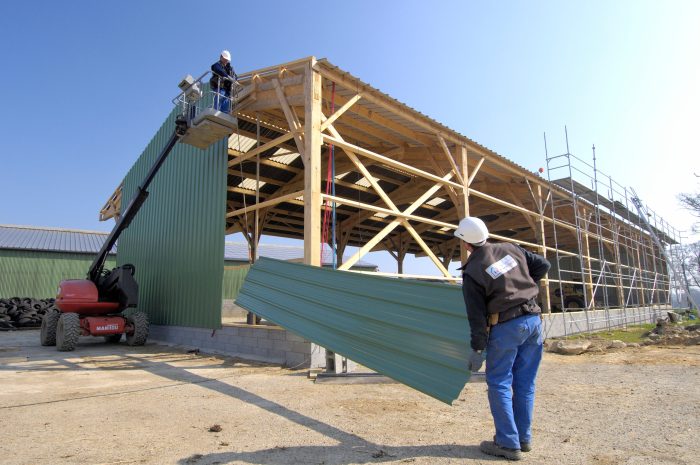
Installing metal siding requires meticulous preparation and precise execution to ensure a durable and aesthetically pleasing finish. Proper installation techniques are crucial for preventing issues such as leaks, warping, and premature deterioration. This section details the step-by-step process, emphasizing accuracy and attention to detail.
Surface Preparation for Metal Siding Installation
Before commencing installation, thorough surface preparation is paramount. This involves removing any existing siding, ensuring the underlying structure is sound, and addressing any potential issues. Inspect the wall framing for rot, damage, or insect infestation. Repair or replace any compromised components. Clean the surface of dirt, debris, loose paint, and any other contaminants that could interfere with adhesion or create unevenness. For optimal results, ensure the surface is level and plumb. This foundational step prevents future problems and ensures a long-lasting installation.
Measuring and Cutting Metal Siding Panels
Accurate measurement and cutting are critical for a seamless and professional-looking installation. Begin by carefully measuring the length and width of each wall section. Transfer these measurements to the metal siding panels, adding allowances for overlaps and cuts. Use sharp, metal-cutting shears or a circular saw with a metal-cutting blade to ensure clean, precise cuts. Avoid excessive force to prevent bending or warping the panels. Precise cuts minimize waste and ensure a perfect fit, contributing to the overall quality of the installation.
Installation of Flashing and Other Components
Flashing is essential for preventing water penetration around windows, doors, and other penetrations in the wall. Install flashing before attaching the siding panels. Use appropriate flashing materials, such as aluminum or galvanized steel, ensuring a watertight seal. Other necessary components, including J-channel, corner trim, and end caps, should be installed according to manufacturer instructions. Proper flashing installation prevents water damage, a common problem in improperly installed siding systems. For example, flashing around a window should extend several inches beyond the window frame and overlap the siding panels for effective water diversion.
Securing Metal Siding Panels to Wall Framing
Once the flashing and trim are in place, begin attaching the metal siding panels. Use appropriate fasteners, such as self-drilling screws or nails, ensuring they are driven straight and flush to avoid damage to the panels. Follow the manufacturer’s recommended spacing for fasteners. Maintain consistent spacing and alignment throughout the installation to create a uniform and professional look. Overly tight fasteners can damage the panels, while under-tightened fasteners may lead to loose or rattling siding. A consistent approach ensures structural integrity and a pleasing aesthetic.
Metal Siding Installation Steps
- Surface Preparation: An image depicting the removal of old siding, inspection of wall framing, and cleaning of the surface. The image shows a worker meticulously checking for damaged wood and removing loose debris with a wire brush. The background clearly displays a house undergoing renovation.
- Measurement and Cutting: An image showcasing the accurate measurement of a wall section using a tape measure and the precise cutting of a metal siding panel using metal shears. The image highlights the careful marking of the panel and the clean cut achieved. The tools are clearly visible, and the worker is wearing appropriate safety gear.
- Flashing Installation: An image demonstrating the installation of flashing around a window opening. The image clearly shows the overlapping layers of flashing, creating a watertight seal. The flashing is neatly tucked under the window frame and extends beyond the siding panel. The image shows a detail of the precise overlap and sealing.
- Panel Attachment: An image depicting the process of securing a metal siding panel to the wall framing using self-drilling screws. The image highlights the consistent spacing and alignment of the fasteners. The panel is securely fastened, and the screws are flush with the surface. The image shows a close-up view of the screw placement.
Tools and Equipment
Metal siding installation requires a range of tools and equipment, from basic hand tools to specialized power tools. The appropriate selection and proper use of these tools are crucial for ensuring a safe, efficient, and high-quality installation. Improper tool use can lead to injury, damage to the siding, and ultimately, a substandard installation.
Proper tool selection and maintenance are paramount for a successful metal siding project. The tools and equipment listed below represent a comprehensive set for most installations, although specific needs may vary depending on the project’s scope and complexity. Choosing high-quality tools will improve efficiency and longevity, reducing the overall cost over time.
Essential Tools and Equipment for Metal Siding Installation
The following tools are essential for efficient and safe metal siding installation. Having these tools readily available will streamline the process and ensure a professional finish. Always prioritize tools in good working order to avoid accidents and delays.
- Measuring Tapes: Essential for accurate measurements of the wall surface and siding panels, ensuring precise cuts and minimizing waste.
- Chalk Line: Used to mark straight lines on the wall, providing a guide for accurate panel placement and ensuring consistent alignment.
- Level: Crucial for ensuring that the siding panels are installed perfectly level and plumb, preventing unsightly imperfections and structural issues.
- Metal Shears: Specifically designed for cutting metal siding panels cleanly and accurately, minimizing the risk of damaging the material.
- Tin Snips: Useful for trimming and cutting smaller pieces of metal siding, particularly around corners and openings.
- Drill with various bits: Required for drilling pilot holes before driving screws to prevent splitting of the siding and for installing fasteners.
- Screwdriver (impact driver recommended): Used for driving screws securely into the framing, ensuring a strong and durable installation.
- Safety Glasses: Protect eyes from flying debris during cutting and installation.
- Work Gloves: Protect hands from cuts and abrasions caused by sharp metal edges.
- Ladder: Provides safe access to higher areas during installation, essential for both safety and efficiency.
- Scaffolding (for large projects): Offers a stable and safe working platform for extensive installations.
- Seam Sealer: Used to seal seams and joints, preventing water penetration and enhancing the longevity of the siding.
- Caulk Gun: Used for applying seam sealant smoothly and efficiently.
- J-Channel and other trim pieces: Used to create a neat and professional finish at corners, edges, and around windows and doors.
Safety Precautions When Using Power Tools
Power tools, while essential for efficient installation, pose significant safety risks if not used correctly. Always prioritize safety by following these guidelines:
- Always wear appropriate safety equipment, including safety glasses, work gloves, and hearing protection. Dust masks are also recommended when cutting or working with metal.
- Ensure the power tool is properly maintained and in good working order. Regularly check for damaged cords, loose parts, and ensure all safety features are functioning correctly.
- Never operate power tools while fatigued or under the influence of drugs or alcohol. Maintain focus and awareness at all times.
- Use the correct tool for the job. Attempting to use a tool for a purpose it’s not designed for can lead to accidents and injuries.
- Keep your work area clean and organized to prevent tripping hazards and ensure safe movement around the work site.
- Disconnect the power tool from the power source before making adjustments or changing bits. This prevents accidental starting and injuries.
- Always use appropriate personal protective equipment (PPE), which includes safety glasses, hearing protection, and work gloves.
Tool Maintenance and Storage
Proper tool maintenance and storage are critical for extending the lifespan of your equipment and ensuring its readiness for future projects.
- Clean tools thoroughly after each use, removing any debris or residue. This prevents corrosion and ensures the tools remain in optimal working condition.
- Inspect tools regularly for damage or wear. Replace or repair damaged tools immediately to prevent accidents and ensure consistent performance.
- Store tools in a dry, secure location, away from extreme temperatures and moisture. This helps prevent corrosion and damage.
- Keep tools organized and easily accessible for efficient retrieval during future projects.
Necessary Safety Equipment
The use of appropriate safety equipment is non-negotiable when working with metal siding and power tools. Failure to do so can result in serious injury.
- Safety Glasses: Protect eyes from flying debris and sparks generated during cutting and installation.
- Hearing Protection: Reduce exposure to loud noises generated by power tools, preventing hearing damage.
- Work Gloves: Protect hands from cuts, abrasions, and punctures caused by sharp metal edges and tools.
- Dust Mask: Reduces inhalation of metal dust and particles, protecting respiratory health.
- Hard Hat: Protects the head from falling objects, especially important when working at heights.
- Safety Harness and Fall Protection System (for working at heights): Provides crucial protection against falls from ladders or scaffolding.
Cost Considerations: Metal Siding Installation
Metal siding installation costs vary significantly depending on several factors. Understanding these cost drivers is crucial for budgeting and planning your project effectively. This section will break down the components of the overall cost, providing a sample estimate and comparing metal siding to alternative options.
Cost Breakdown
The total cost of metal siding installation is comprised of material costs, labor costs, and permit fees. Material costs depend on the type of metal siding chosen (steel, aluminum, zinc, copper), its gauge (thickness), and the size of the area to be covered. Labor costs vary based on the complexity of the installation, the installer’s experience, and regional labor rates. Permit fees are determined by local building codes and regulations. Unexpected costs, such as repairs to underlying sheathing or unforeseen structural issues, can also add to the overall expense.
Factors Influencing Overall Cost
Several factors significantly influence the final cost of a metal siding project. The size of the house directly impacts material needs and labor hours. The complexity of the house’s design, including numerous angles, dormers, or intricate details, increases labor costs. The chosen metal siding type and its quality significantly impact material costs; higher-grade materials are generally more expensive but often offer better durability and longevity. Regional variations in labor rates and material availability also contribute to cost differences across geographical locations. Finally, the need for additional work, such as removing existing siding or repairing underlying structural issues, adds unexpected costs.
Sample Cost Estimate, Metal siding installation
Let’s consider a sample cost estimate for a typical 1,500 square foot house. We’ll assume the use of standard steel siding, a moderately complex installation, and average labor rates.
| Cost Item | Estimated Cost |
|---|---|
| Materials (Siding, Fasteners, Trim) | $6,000 – $10,000 |
| Labor | $5,000 – $8,000 |
| Permits | $300 – $500 |
| Total Estimated Cost | $11,300 – $18,500 |
This estimate provides a range to account for variations in material choices and labor rates. It’s crucial to obtain multiple quotes from reputable contractors to get a more precise estimate for your specific project.
Cost Comparison with Other Siding Options
Metal siding offers a competitive cost-benefit profile compared to other siding materials. While the initial investment might be higher than vinyl siding, its superior durability and longevity often result in lower long-term costs. Wood siding, while aesthetically pleasing, requires significant maintenance and is prone to rot and insect damage, leading to potentially higher long-term costs than metal. Vinyl siding typically has the lowest initial cost, but its shorter lifespan and susceptibility to damage can lead to higher replacement costs over time. A comprehensive lifecycle cost analysis, considering initial investment, maintenance, and lifespan, is necessary for a fair comparison. For example, a house requiring siding replacement every 15 years with vinyl might incur higher overall costs than a house with metal siding lasting 50 years, despite the higher initial investment in metal.
Common Installation Challenges and Solutions
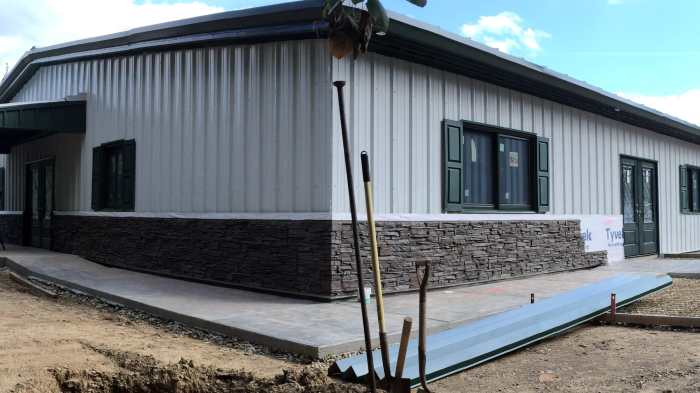
Metal siding installation, while relatively straightforward, presents several potential challenges that can impact the final aesthetic and structural integrity of the project. Understanding these challenges and implementing appropriate solutions is crucial for a successful installation. This section Artikels common problems and provides effective strategies for overcoming them.
Uneven Wall Surfaces
Uneven wall surfaces are a frequent obstacle in metal siding installation. Variations in the wall’s plane can lead to gaps, buckling, or improper alignment of the siding panels. To address this, careful preparation is key. Before installation, assess the wall’s condition. Significant irregularities may require shimming or furring strips to create a more consistent surface. Furring strips, thin wooden or metal strips, are attached to the existing wall to create a level plane for the siding. Shims, small wedges, can be used to adjust the position of individual furring strips. This process ensures that the siding panels have a uniform base to attach to, preventing warping or unevenness. Precise measurements and careful placement of these strips are essential to achieve a smooth, professional finish.
Difficult Corners and Transitions
Corners and transitions, such as around windows and doors, often present unique challenges. Properly managing these areas requires precise cuts and the use of appropriate trim pieces. Failing to accurately measure and cut the siding panels can lead to gaps, misalignment, or an unprofessional appearance. Using specialized corner trim pieces designed for metal siding ensures a clean, finished look and prevents water penetration. These pieces are specifically manufactured to seamlessly integrate with the siding panels, creating a tight, weather-resistant seal. Careful planning and accurate cutting are vital for a successful outcome in these areas.
Ensuring Proper Ventilation
Adequate ventilation behind metal siding is crucial for preventing moisture buildup, which can lead to mold, mildew, and structural damage. This is achieved by leaving sufficient space between the siding and the house’s exterior sheathing. This space allows for air circulation, drawing moisture away from the wall assembly. Ventilation is typically achieved through the use of vented soffits and ridge vents, which work in conjunction to create a natural airflow. Additionally, proper installation techniques, such as ensuring sufficient spacing between the siding panels and the underlying structure, contribute to effective ventilation. Neglecting ventilation can significantly reduce the longevity and structural integrity of the building.
Window and Door Installations
Installing metal siding around windows and doors requires careful planning and execution. Precise measurements are essential to ensure a snug fit and prevent water leakage. Specialized flashing and trim pieces are used to create a weathertight seal around these openings. Flashing, typically made of metal or rubber, is installed under the siding to direct water away from the openings. Trim pieces cover the flashing and provide a finished appearance. Accurate measurements and the correct installation of these components are critical for preventing water damage and maintaining the integrity of the structure. Failure to properly seal these areas can lead to costly water damage and repairs.
Maintaining Metal Siding
Metal siding, while durable, requires regular maintenance to preserve its aesthetic appeal and extend its lifespan. Neglecting maintenance can lead to premature deterioration, costly repairs, and diminished curb appeal. A proactive approach to cleaning, inspection, and minor repair ensures your siding remains a valuable and attractive part of your home for years to come.
Cleaning Metal Siding
Regular cleaning removes dirt, grime, and pollutants that can dull the finish and potentially damage the protective coatings. For routine cleaning, a garden hose with a nozzle is often sufficient. For more stubborn stains or mildew, a solution of mild detergent and water applied with a soft-bristled brush can be effective. Always rinse thoroughly to prevent residue buildup. Avoid abrasive cleaners or high-pressure washers, as these can damage the siding’s finish. For particularly challenging stains, consider using a specialized siding cleaner designed for metal surfaces, following the manufacturer’s instructions carefully.
Preventing Weather Damage
Extreme weather conditions, such as hail, strong winds, and heavy snow, can damage metal siding. Regular inspections, especially after severe weather events, are crucial for early detection of any damage. Properly installed and maintained gutters and downspouts are essential for diverting water away from the siding and foundation, preventing water damage and ice buildup. Consider trimming overhanging branches that could scratch or dent the siding during storms. In areas prone to hail, installing hail guards or using impact-resistant siding can mitigate potential damage.
Regular Inspections for Potential Problems
Regular inspections, ideally twice a year (spring and fall), are vital for early problem detection. Check for loose panels, dents, scratches, rust, or signs of corrosion. Pay close attention to areas around seams, fasteners, and corners, as these are often vulnerable points. Inspect gutters and downspouts for proper drainage and clear any blockages. Addressing minor issues promptly prevents them from escalating into larger, more expensive problems. For example, a small dent can be easily repaired, while a large dent may require panel replacement.
Repairing Minor Damage
Minor dents and scratches can often be repaired with minimal effort. Small dents can sometimes be gently tapped back into place using a rubber mallet and a soft block of wood to avoid further damage. For deeper dents or scratches that compromise the protective coating, consider using a touch-up paint designed for your specific siding color. Always clean the affected area before applying the paint. Larger areas of damage or significant corrosion may require professional repair or panel replacement. For instance, rust spots should be addressed promptly with a rust remover and treated with a protective coating to prevent further corrosion.
Environmental Considerations

Metal siding, while offering durability and aesthetic appeal, presents environmental considerations throughout its lifecycle, from manufacturing to disposal. Understanding these impacts is crucial for making informed choices and promoting sustainable building practices. This section examines the environmental footprint of metal siding production and disposal, compares it to alternative siding materials, and Artikels sustainable waste management strategies.
Environmental Impact of Metal Siding Production and Disposal
The production of metal siding involves energy consumption for mining raw materials, manufacturing processes, and transportation. Aluminum production, for example, is energy-intensive, requiring significant electricity to extract aluminum from bauxite ore. Steel production also involves substantial energy use in the smelting and processing of iron ore. Disposal of metal siding, if not properly managed, can contribute to landfill waste and potential leaching of materials into the environment. However, the environmental impact varies considerably depending on the specific metal used (aluminum, steel, zinc), the manufacturing processes employed, and the end-of-life management strategies implemented. For instance, the use of recycled materials in the manufacturing process significantly reduces the environmental impact compared to using virgin materials.
Comparison of Metal Siding to Other Siding Options
Compared to other siding options, metal siding offers several environmental advantages. Vinyl siding, a common alternative, is derived from petroleum, a non-renewable resource, and its production releases greenhouse gases. Wood siding, while a renewable resource, often requires the harvesting of trees, potentially leading to deforestation and habitat loss if not sourced sustainably. Furthermore, wood siding is susceptible to rot, insect infestation, and requires more frequent maintenance and eventual replacement, thus contributing to a larger environmental footprint over its lifespan. Metal siding’s durability and longevity reduce the frequency of replacement, minimizing the overall environmental impact compared to these alternatives. The recyclability of metal siding also contributes to its more favorable environmental profile.
Sustainable Practices for Handling Metal Siding Waste
Sustainable practices are crucial for minimizing the environmental impact of metal siding waste. Recycling is the most environmentally responsible approach. Many metal siding manufacturers offer recycling programs, facilitating the collection and reprocessing of scrap metal. Proper demolition and deconstruction techniques are vital to ensure that metal siding is salvaged and recycled rather than ending up in landfills. This involves careful removal of the siding panels, minimizing damage, and separating them from other construction materials. Proper sorting and cleaning of the salvaged metal are also crucial for efficient recycling. Landfill diversion programs and initiatives promoting the reuse of metal siding in other construction projects can further contribute to sustainability.
Recyclability of Different Metal Siding Materials
The recyclability of metal siding materials varies depending on the type of metal. Aluminum siding is highly recyclable, with a high recycling rate and minimal loss of material quality during the process. Steel siding is also readily recyclable, with a well-established infrastructure for collection and processing. Zinc siding, while recyclable, may have lower recycling rates due to less developed infrastructure and potential contamination with other materials. The recyclability of coated metal siding depends on the type of coating and the effectiveness of separation processes during recycling. Manufacturers’ specifications and local recycling facilities should be consulted to determine the recyclability of specific metal siding products.
Mastering metal siding installation involves a blend of careful planning, precise execution, and a proactive approach to maintenance. By understanding the various metal siding options, their unique properties, and the detailed installation process, homeowners can confidently embark on this project, achieving a stunning and durable exterior for years to come. Remember, prioritizing safety, using the right tools, and addressing potential challenges proactively will contribute to a successful outcome. Investing time in understanding the intricacies of metal siding installation will ultimately lead to a rewarding and long-lasting improvement to your property.
Expert Answers
What is the average lifespan of metal siding?
Metal siding, depending on the type and quality, can last 30-50 years or even longer with proper maintenance.
Can I install metal siding myself?
While possible for DIY enthusiasts with experience, professional installation is often recommended due to the complexities and safety considerations involved.
How do I clean metal siding?
Regular cleaning with mild soap and water is usually sufficient. For tougher stains, use a pressure washer cautiously to avoid damage.
What are the warranty options for metal siding?
Warranty periods vary by manufacturer and type of siding. Check with your supplier for details.
Is metal siding recyclable?
Yes, most metal siding materials are recyclable, contributing to environmentally friendly building practices.
